Back
This guide is for PULSE version JUN2025. Some things will apply to older versions but check which version you are on if some features are missing.

Main menu pages can be re-ordered by dragging and dropping. All pages can be re-ordered using the order column with the lowest number being the top of the list. Re-ordering only applies to a grouping of pages belonging to the same parent.
The page ID is listed in the ID column.
The menu column allows for the page to either be shown or hidden in the navigation menu on the website.
The private column allows for the pages to be made private for viewing in the portal module (if one is present).
The enable column allows for the pages to be shown or hidden on the website. It allows pages to be quickly archived and brought back if needed.
This is where content can be added to a page. In the top left corner, click the link beside View Page to either view the page preview (if the page is disabled) or view the active page on the site (if the page is enabled).
To duplicate a page, click copy and it will make a duplicate version to be modified. This is useful if there are multiple similar pages to add to the website.
A QR code is generated to go to that page of the website. Click on Download QR to save the image. This code can be printed and then scanned with a phone which will bring the user directly to that page of the website.

This is the page editor where content can be added and modified. This is carried out using a visual editor, a well supported third-party plugin called CKEditor. This allows a certain level of WYSIWYG (what you see is what you get) editing. Source view editing is also provided by clicking on the source button in the top left corner.
Type Tools
Copy/Paste
Basic Styles
Lists/Alignment
Links
Images
Maximise
Show Blocks
Source is for editing the raw HTML code by clicking on the Source button. Clicking the button again will return to editor mode and any changes made to the source will be rendered.
There are two tabs for Live Content and Pending Content where content can be worked on and updated before setting it live. To use pending content, the source content from the Live content tab needs to be copied into the source of the pending content tab.
A publish date and publish time in the future also need to be set and then hit save. The content can then be edited and previewed.
It will automatically move the pending content to live content on the date and time set. It can also just be copied back to live content manually to set it live immediately.

[plugin]TILES1[/plugin]
[plugin]GALLERY[/plugin]
[plugin]TESTIMONIALS[/plugin]
The tiles plugin is special allowing for multiple instances of the tile plugin on one page in groups that can be separated by other content. TILES1 will be all tiles on the page with group 1, TILES2 will be all tiles on the page with group 2 and so on.
In the search options, clicking on Include Removed checkbox will show all pages that have been removed which can then be restored using the restore button if needed.
A removed page will show as red in the list.

Give the billboard a name (internal reference) and assign it to an existing page on the website.
By clicking green edit button on the righthand side you will go directly to the page where you can create or edit your content.
Clicking remove (red x) it will remove the page from the list.

All billboards can be re-ordered using the order column with the lowest number being at the top of the list.


Add a slide by entering the name, caption, and choose an image. Click Add.
There is no limit to the amount of slides that can be added.
Slides will show in a list below the add fields.
Slides can be re-ordered using the order column with the lowest number being at the top of the list.
In the search options, clicking on Include Removed checkbox will show all billboards that have been removed which can then be restored using the restore button if needed.
A removed billboard will show as red in the list.

Adding a file with the same filename as an existing file will overwrite the file.
Click on the remove button to remove the file. This will remove the file from the list.
If the file needs to be restored, use the search area and select Include Removed to show all files that were removed. They can then be restored by clicking the restore button.
A removed file will show as red in the list.
Give the tile a name and assign it to an existing page on your site.
The caption and image can be added at this time or later when editing.
By clicking green edit button on the righthand side you will go directly to the page where you can create or edit your content.
Clicking remove (red x) it will remove the page from the list.
All tiles can be re-ordered using the order column with the lowest number being at the top of the list.
Tiles can also be grouped. This is useful when tiles on the same page need to be split up by some other content.
All tiles in a specific group will be shown together on the page that the plugin is on.


Click the remove button on the right-hand side to remove the tile from the list.
PULSE will prompt to confirm.
In the search options, clicking on Include Removed checkbox will show all tiles that have been removed which can then be restored using the restore button if needed.
A removed tile will show as red in the list.

All blocks can be re-ordered using the order column with the lowest number being at the top of the list.


Click the remove button on the right-hand side to remove the page from the list. PULSE will prompt to confirm.
In the search options, clicking on Include Removed checkbox will show all blocks that have been removed which can then be restored using the restore button if needed.
A removed block will show as red in the list.

All galleries can be re-ordered using the order column with the lowest number being at the top of the list.
By clicking green edit button on the righthand side you will go directly to the page where you can create or edit your content.
Keep in mind that page needs the following plugin “[plugin]GALLERY[/plugin]” in the source of the page in the location on the page where the is gallery to appear.

The default is 100%.
The default is auto.
The default is 25% for columns of 4 images.
The default is transparent (no colour).
The default value is 3.
The password is stored in PULSE in plain text, do not use personal passwords.
If there is a date set in date hide field, the gallery will be disabled however it will still show as checked (enabled). This can be unchecked at any point and the date can be removed to clean up if desired.
Click choose file to add individual images or a zip file of multiple images to the gallery. Images once uploaded, can be dragged and dropped to be re-ordered.
Preview images can be resized if they are displayed larger on the front end. Select the new size from the dropdown and click “Resize”.

Click the remove button on the right-hand side to remove the gallery from the list.
PULSE will prompt to confirm.
In the search options, clicking on Include Removed checkbox will show all galleries that have been removed which can then be restored using the restore button if needed.
A removed gallery will show as red in the list.
By clicking green edit button on the righthand side you will go directly to the page where you can create or edit your content.

A disabled testimonial will show as greyed out in the list.
All testimonials can be re-ordered using the order column with the lowest number being at the top of the list.
In the search options, clicking on Include Removed checkbox will show all testimonials that have been removed which can then be restored using the restore button if needed.
A removed testimonial will show as red in the list.

Users can also add analytics and tracking code.

Email
Main contact email for the website (typically an info email address).

PULSE User Guide / Web Module
Web Module
The web module is where changes can be made to the website. This is split into Pages, Billboards, Files, Tiles, Blocks, Galleries, Testimonials, and Settings. Each area is designed to modify a specific portion of the website. This guide will go over all of these areas in detail.This guide is for PULSE version JUN2025. Some things will apply to older versions but check which version you are on if some features are missing.
Pages
Introduction
Pages allows users to organize, structure, and add content to the website.Add a Page
Click on [+] Add a page to create a new page for the website. Give the page a name and click Add.
Tip:
Keep the page names short and concise.Ordering and Options
Once a new page has been added, it will show in the list of pages. The default state for a new page is disabled (not viewable by the public). A disabled page will show as greyed out in the list.Main menu pages can be re-ordered by dragging and dropping. All pages can be re-ordered using the order column with the lowest number being the top of the list. Re-ordering only applies to a grouping of pages belonging to the same parent.
The page ID is listed in the ID column.
The menu column allows for the page to either be shown or hidden in the navigation menu on the website.
The private column allows for the pages to be made private for viewing in the portal module (if one is present).
The enable column allows for the pages to be shown or hidden on the website. It allows pages to be quickly archived and brought back if needed.
Edit a Page
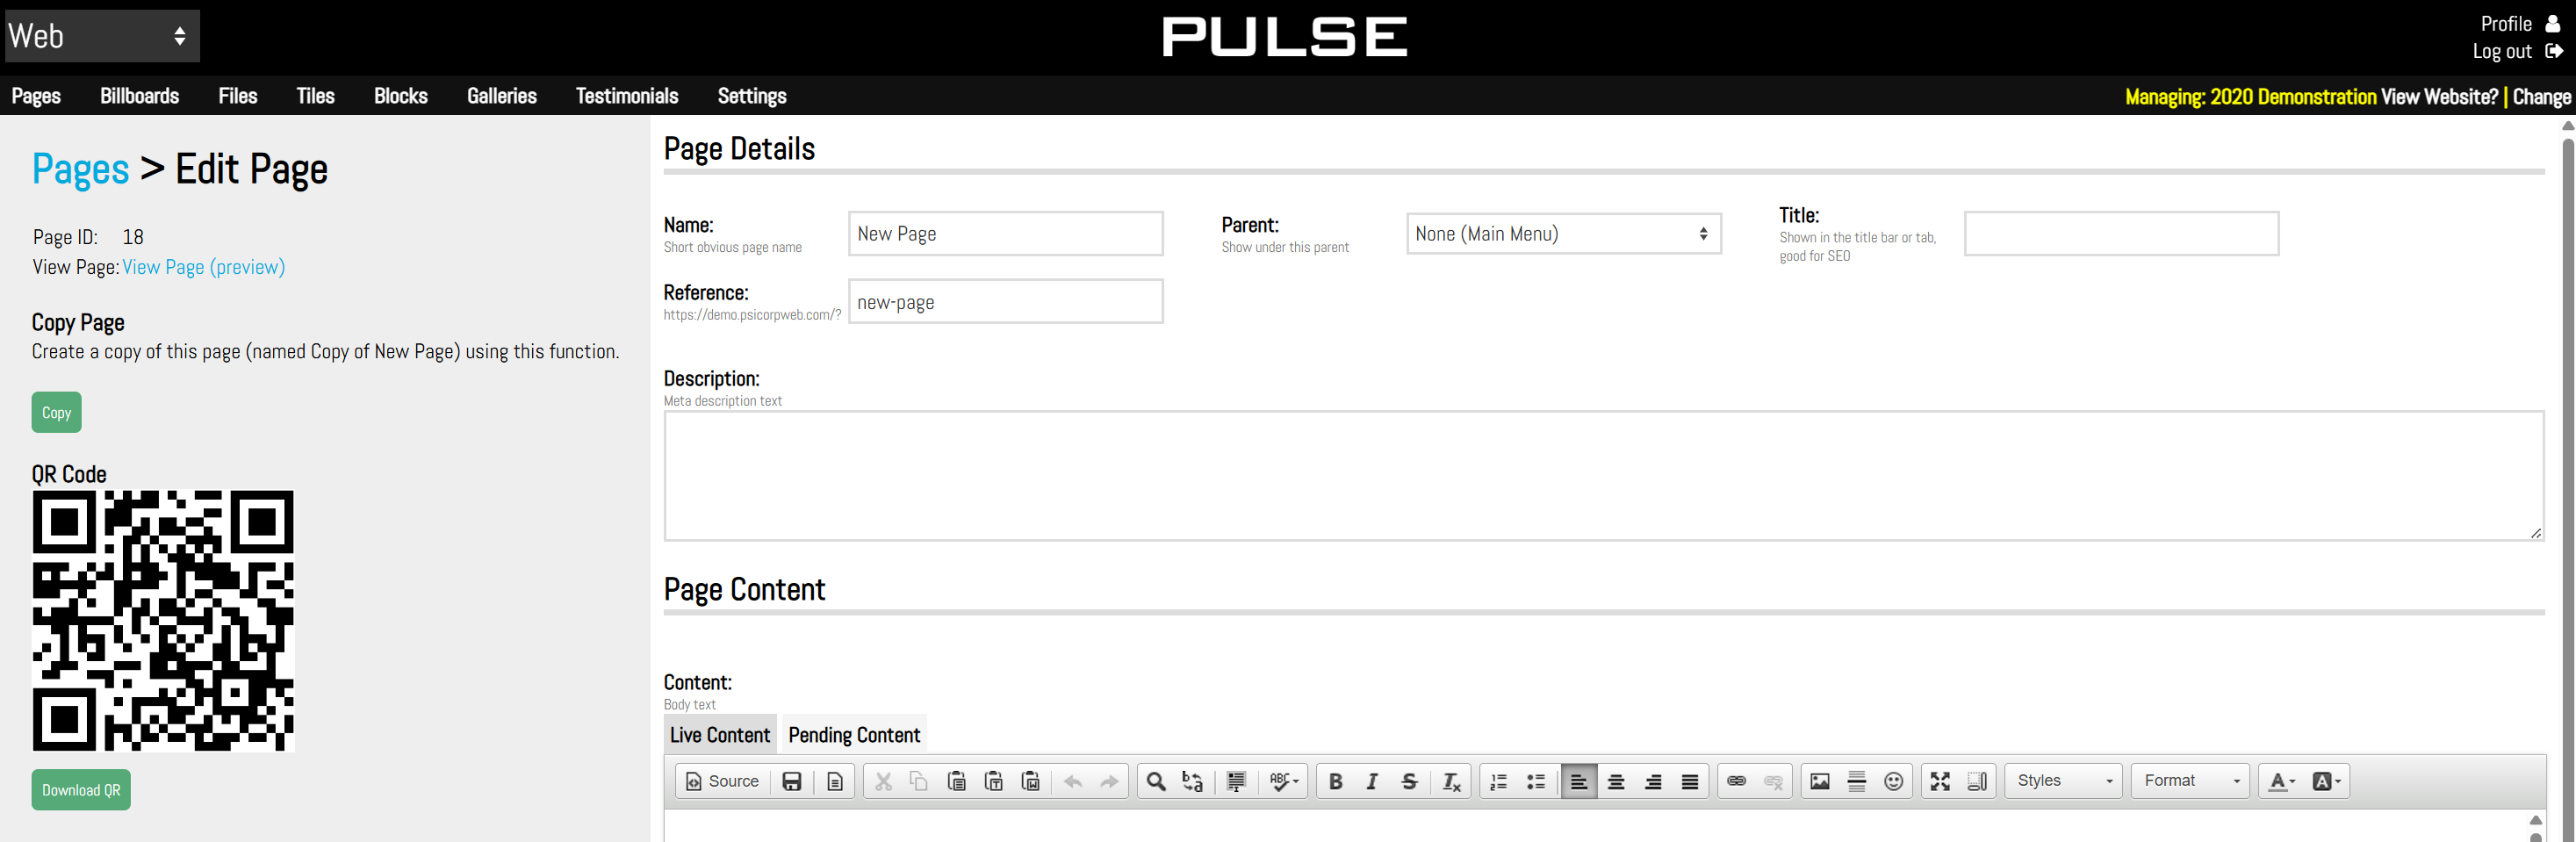
This is where content can be added to a page. In the top left corner, click the link beside View Page to either view the page preview (if the page is disabled) or view the active page on the site (if the page is enabled).
To duplicate a page, click copy and it will make a duplicate version to be modified. This is useful if there are multiple similar pages to add to the website.
A QR code is generated to go to that page of the website. Click on Download QR to save the image. This code can be printed and then scanned with a phone which will bring the user directly to that page of the website.
Page Details
Name
The name of the page can be modified here.Parent
Use the parent dropdown to select which page the current page should be listed under.Title
The title is shown on the browser tab. If left blank, this will default to the page name.Reference
The reference is the portion of text at the end of your website url in the address bar. This can be modified to be SEO friendly. The default uses the page name when the page is created. If the page name is changed, the reference does not change. If the reference is changed, be sure to update any links that are linking to that page as this will break the link using the old reference.Description
Is where a meta description can be added which is what Google reads to know what content is on that page.Tip:
If pages are being repurposed, be sure to update the Name and the Reference.Tip:
The meta description should be 1 or 2 full sentences describing the content on the page. This can help with SEO.Page Content
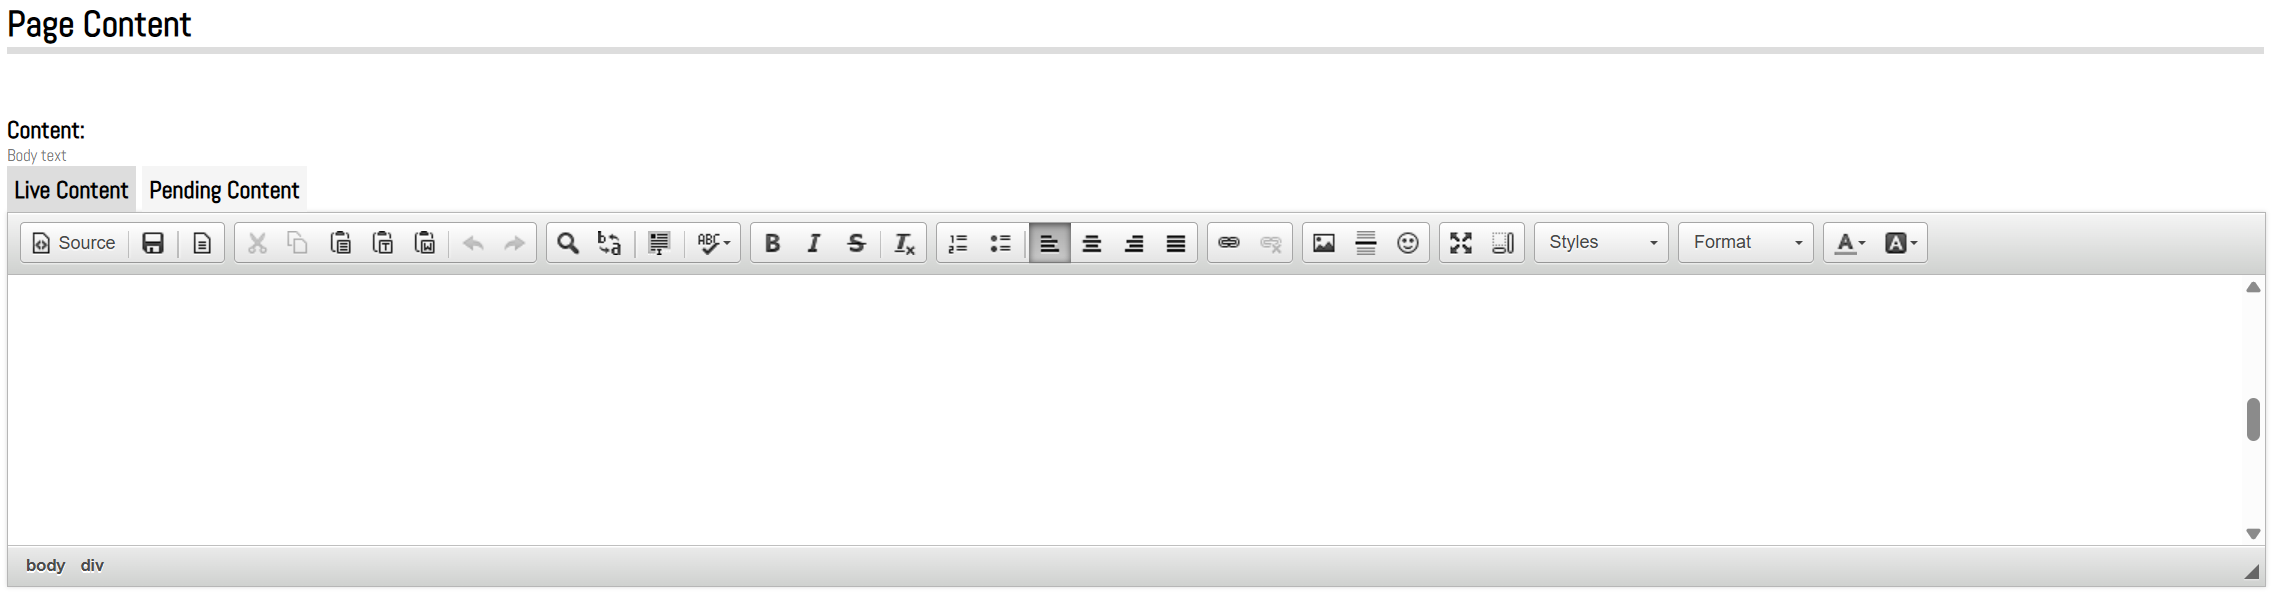
This is the page editor where content can be added and modified. This is carried out using a visual editor, a well supported third-party plugin called CKEditor. This allows a certain level of WYSIWYG (what you see is what you get) editing. Source view editing is also provided by clicking on the source button in the top left corner.
The Editor's toolbar is laid out as follows:
Source ViewType Tools
Copy/Paste
Basic Styles
Lists/Alignment
Links
Images
Maximise
Show Blocks
Source is for editing the raw HTML code by clicking on the Source button. Clicking the button again will return to editor mode and any changes made to the source will be rendered.
There are two tabs for Live Content and Pending Content where content can be worked on and updated before setting it live. To use pending content, the source content from the Live content tab needs to be copied into the source of the pending content tab.
A publish date and publish time in the future also need to be set and then hit save. The content can then be edited and previewed.
It will automatically move the pending content to live content on the date and time set. It can also just be copied back to live content manually to set it live immediately.
Page Options
Publish Date and Publish Time
Are mentioned above and are used when there is pending content.Order
Changes the order number of the page.Menu
The menu checkbox shows or hides the page from the navigation menu on the front end of the website.Show
The show checkbox allows the page to be enabled or disabled (archived).Save Button
When making changes to the page, ensure the save button is clicked before leaving the page otherwise the changes will not be applied.Plugins
When learning about Billboards, Tiles, Galleries, and Testimonials in future documents, it is important to know how to add those to specific pages. Plugins are plain text that will let PULSE know to look for any of the above items associated with the page the plugin is on.The following plugins can be added to the page in plain text:
[plugin]BILLBOARD[/plugin][plugin]TILES1[/plugin]
[plugin]GALLERY[/plugin]
[plugin]TESTIMONIALS[/plugin]
The tiles plugin is special allowing for multiple instances of the tile plugin on one page in groups that can be separated by other content. TILES1 will be all tiles on the page with group 1, TILES2 will be all tiles on the page with group 2 and so on.
Remove a Page
Click the remove button on the right-hand side to remove the page from the list. PULSE will prompt to confirm.In the search options, clicking on Include Removed checkbox will show all pages that have been removed which can then be restored using the restore button if needed.
A removed page will show as red in the list.
Billboards
Introduction
Billboards allows users to add images with caption text to any page on the website.Add a Billboard
Click on [+] Add a billboard to create a new billboard entry.Give the billboard a name (internal reference) and assign it to an existing page on the website.
By clicking green edit button on the righthand side you will go directly to the page where you can create or edit your content.
Clicking remove (red x) it will remove the page from the list.
Ordering and Options
Once a new billboard has been added, it will show in the list of billboards. The default state for a new billboard is disabled (not viewable by the public). A disabled billboard will show as greyed out in the list.All billboards can be re-ordered using the order column with the lowest number being at the top of the list.
Edit a Billboard
This is where the billboard can be customized including changing settings and adding slides and images to the billboard.
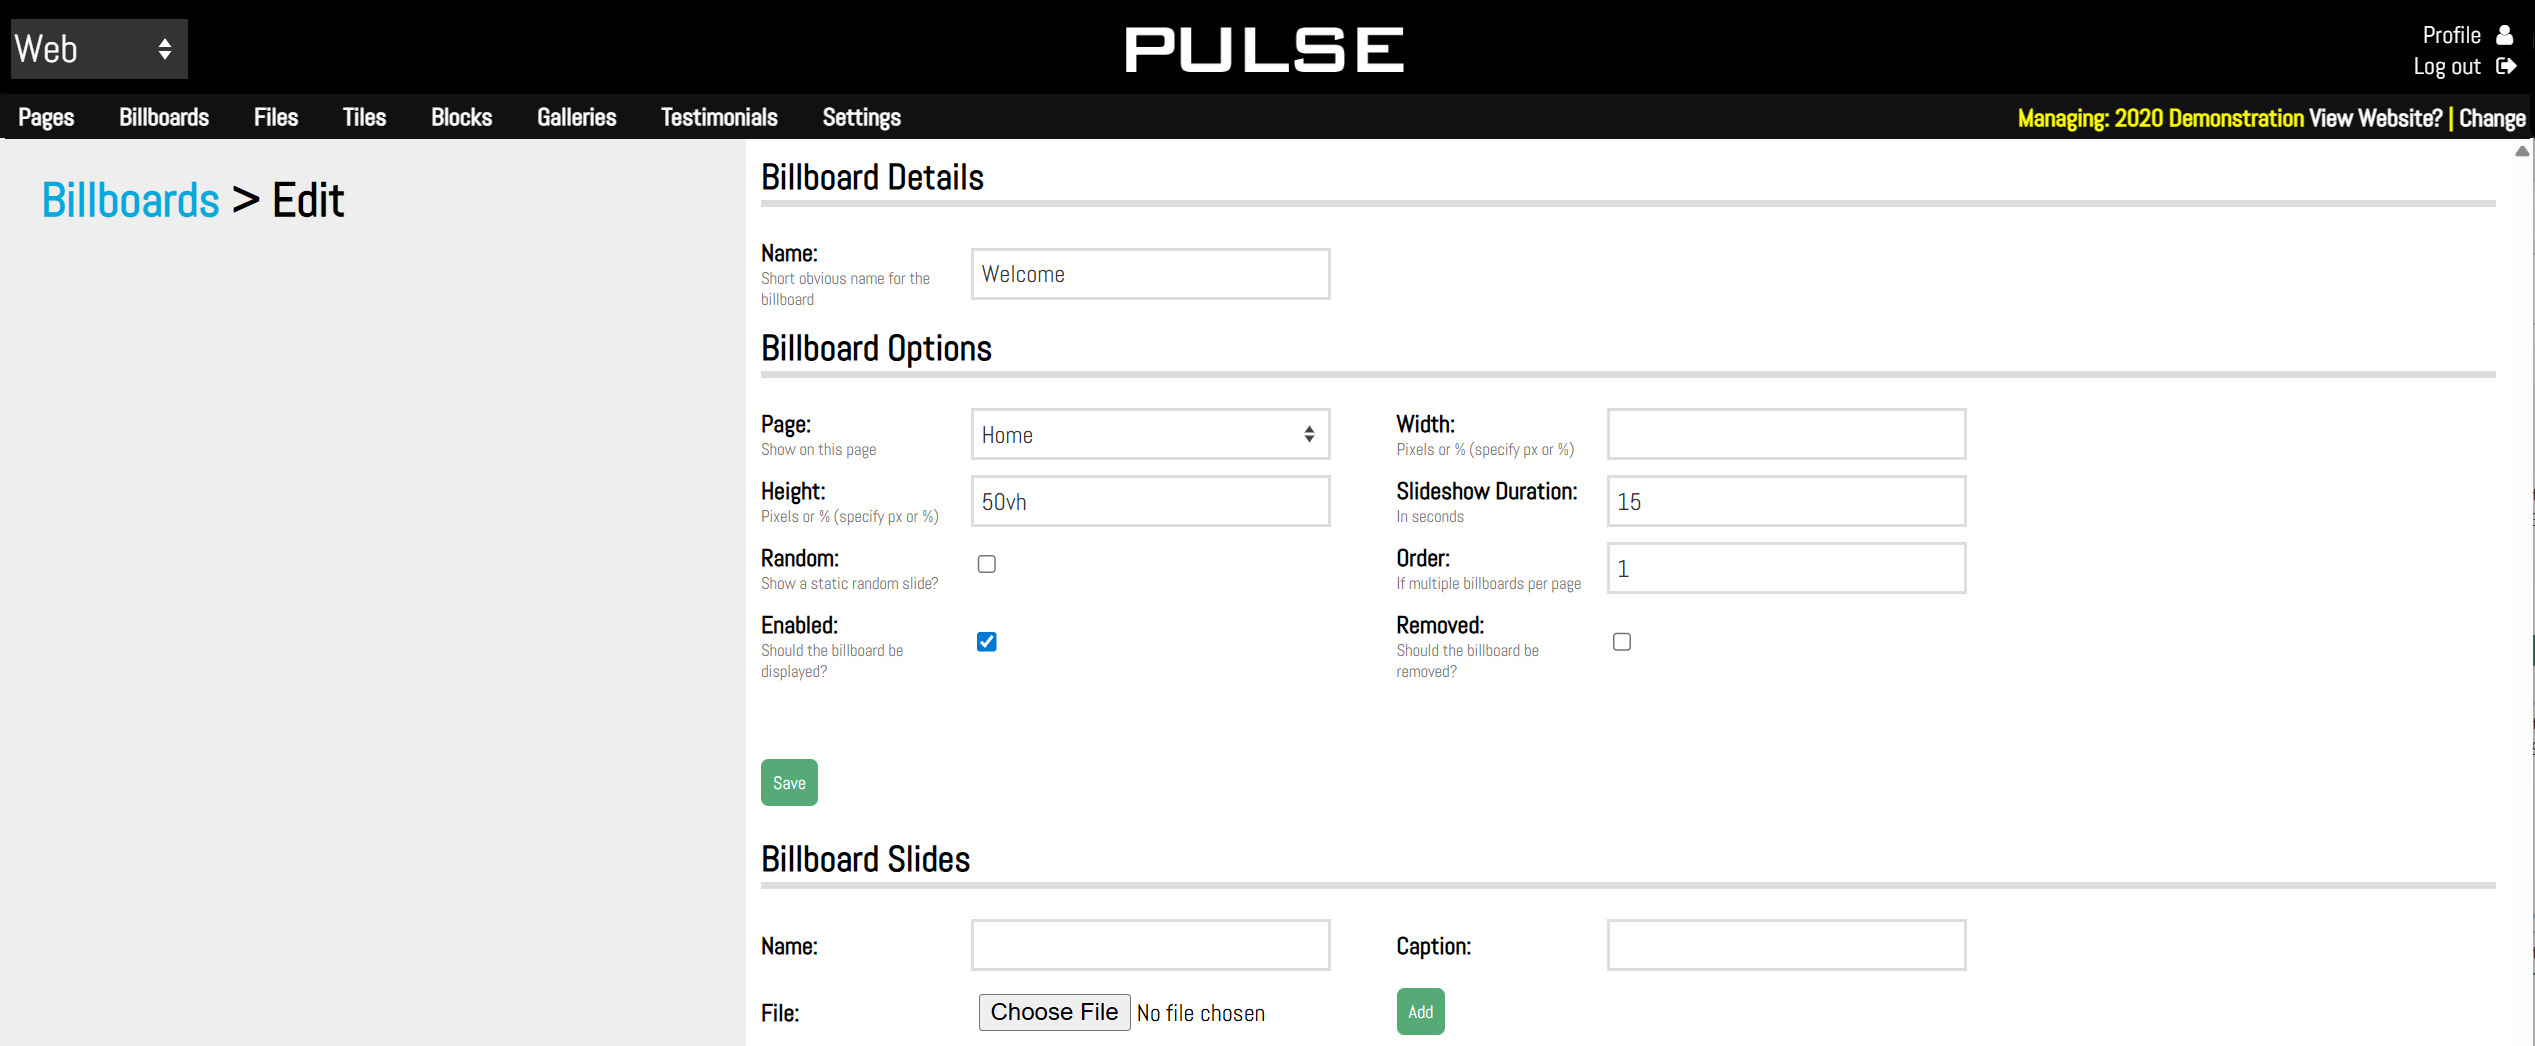
Billboard Details
The name is an internal name just for your reference.
Billboard Options
Page
Select which page the billboard is displayed on.Width
Modify the width of the billboard in either px or %.Height
Modify the height of the billboard in either px or %.Slideshow duration
Change the slide duration for all the slides in that billboard.Random
Can be checked on to only show one random slide to be displayed out of the options you add. This could be a different slide every time the website loads.Order
Change the order of the billboards in the list to keep them organized.Enabled
Checkbox to enable and disable the billboard.Tip:
Make sure the “[plugin]BILLBOARD[/plugin]” in the source of the page in the location on the page where the billboard needs to appear.Billboard Slides
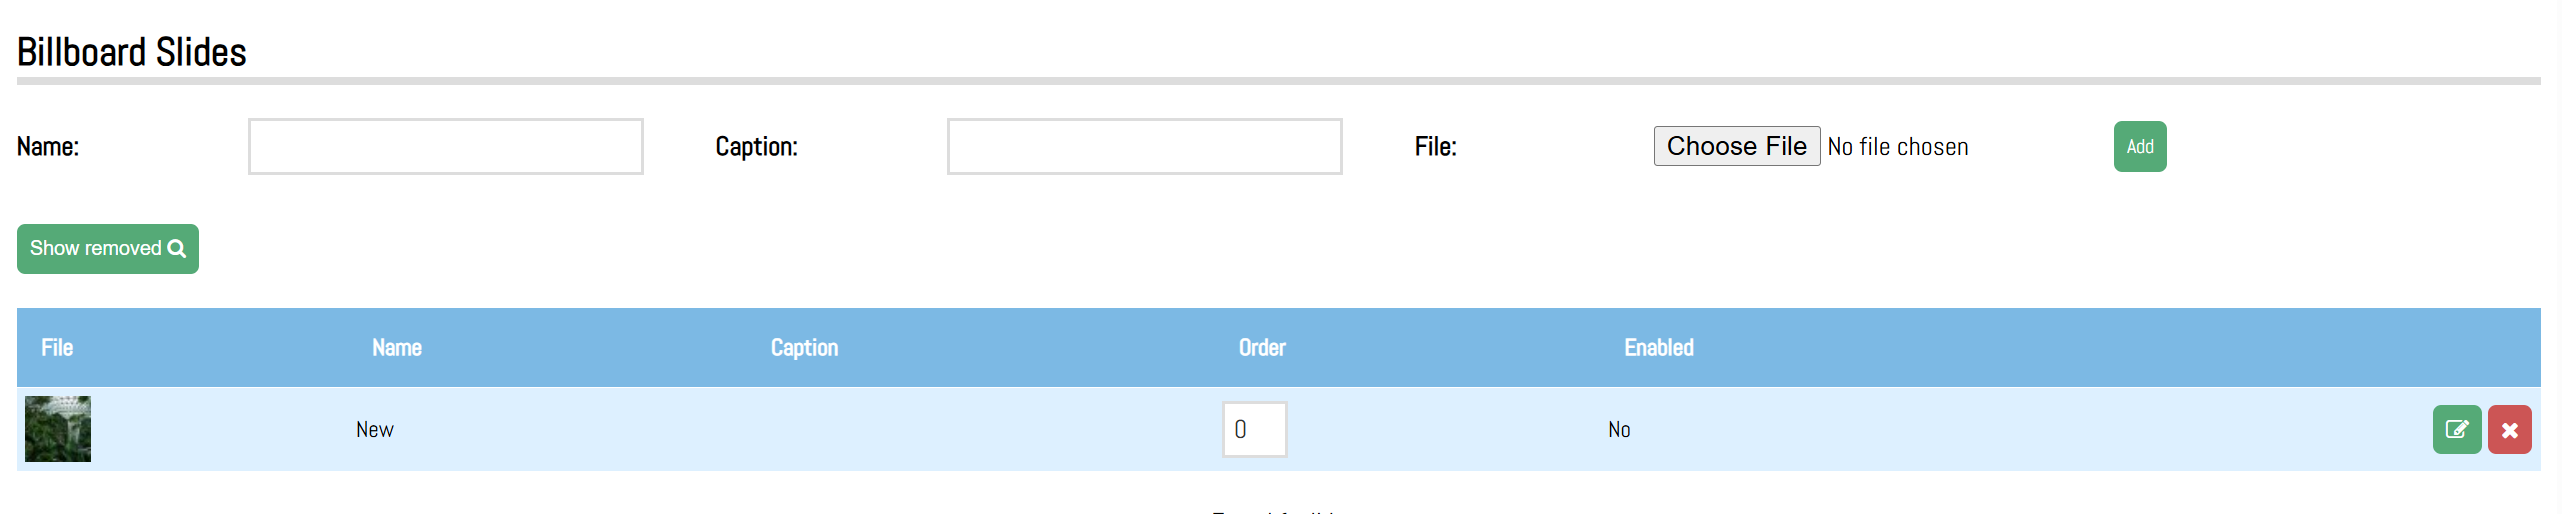
Add a slide by entering the name, caption, and choose an image. Click Add.
There is no limit to the amount of slides that can be added.
Slides will show in a list below the add fields.
Slides can be re-ordered using the order column with the lowest number being at the top of the list.
Edit Slide
This is where the billboard settings can be customized and add images to your slide.
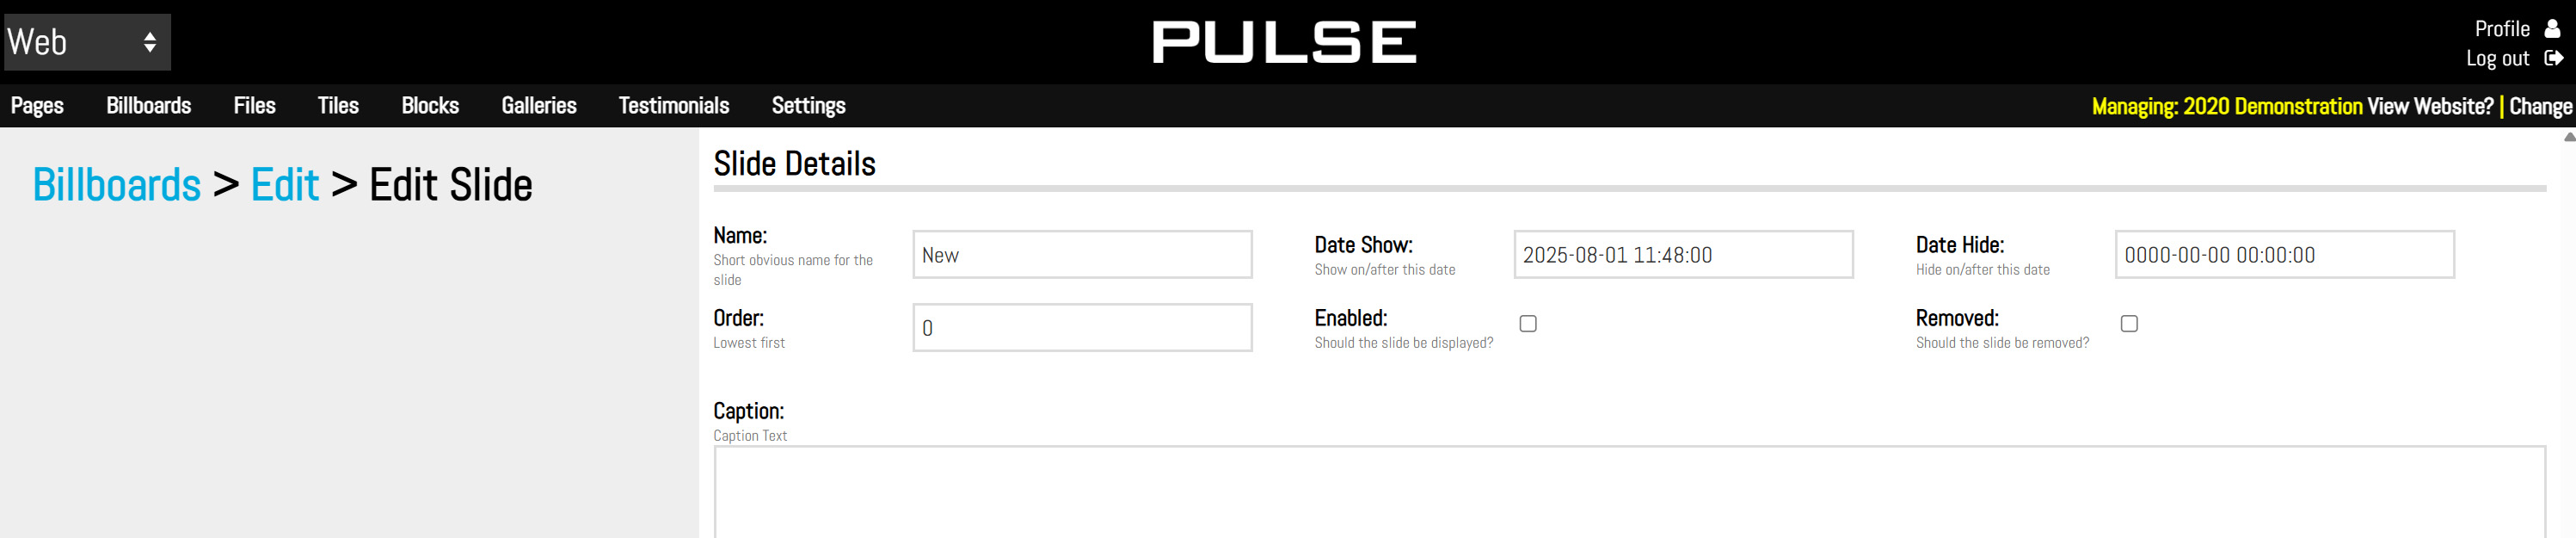
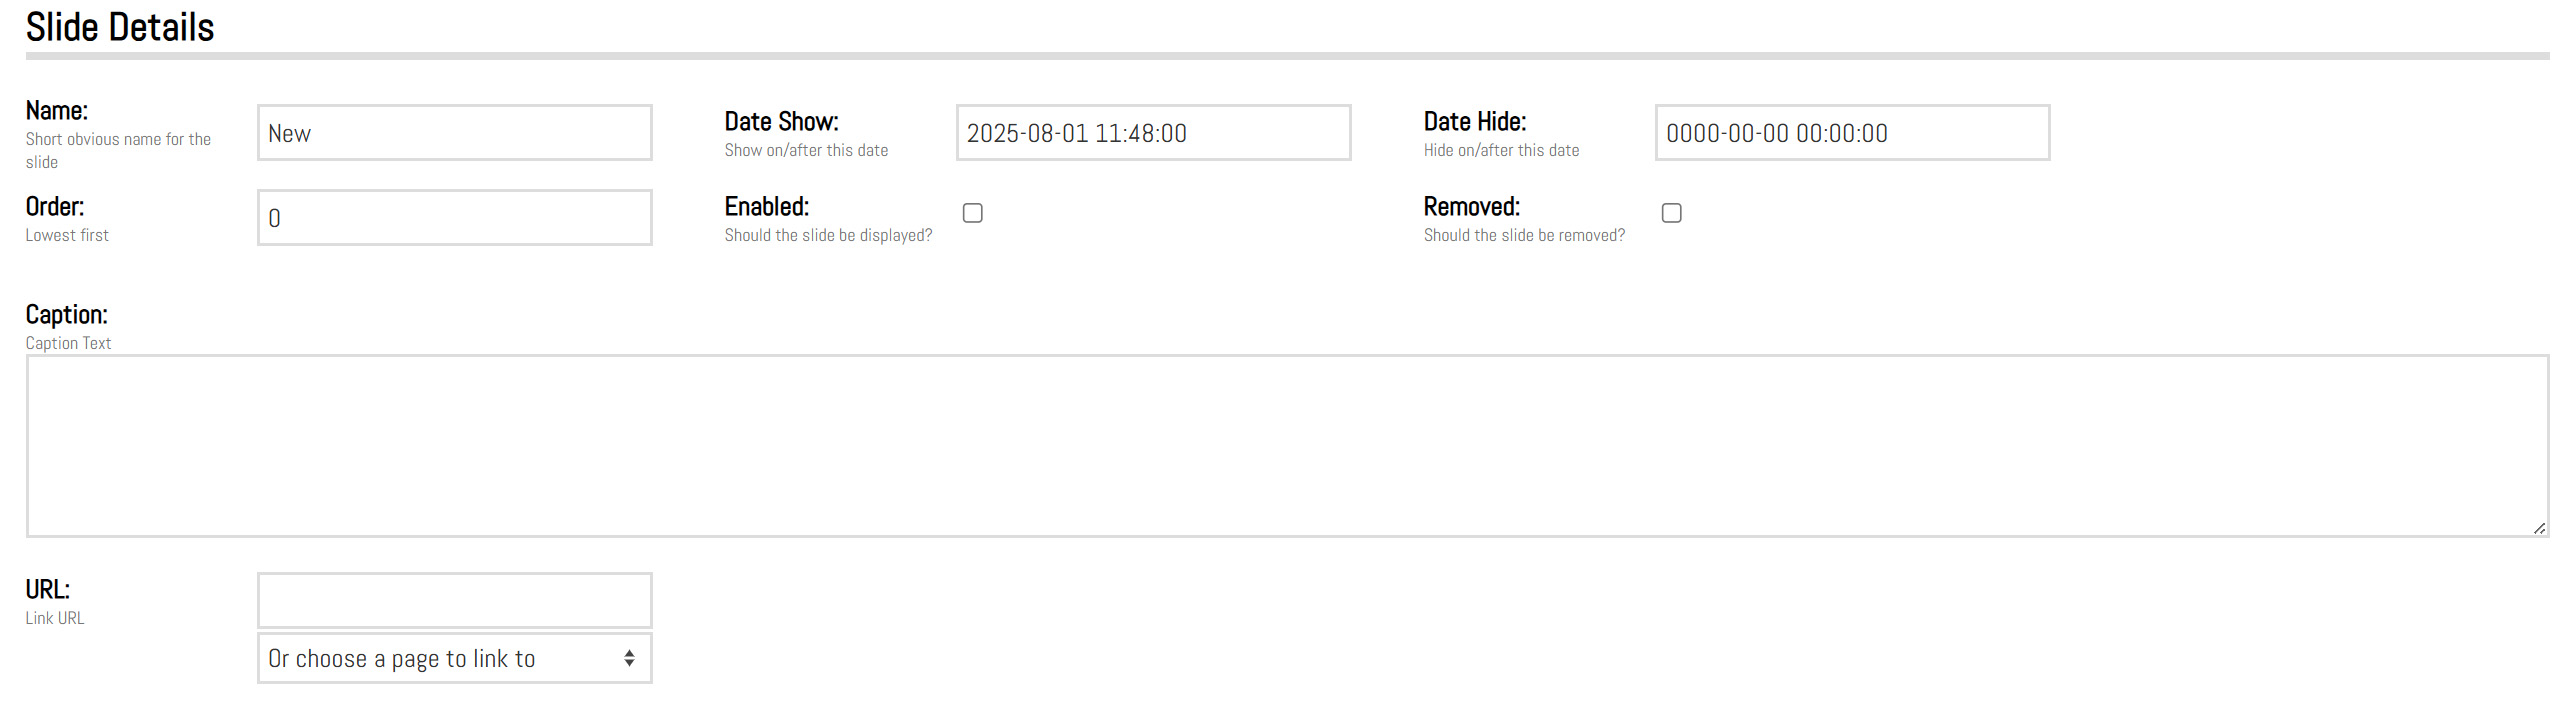
Slide Details
Name
Is an internal reference.Order
Change the order of the slides displayed on the billboard.Enable
Checkbox to enable and disable the individual slide.Caption
Is a free text field to add HTML for the slide caption. The styles are dictated by the CSS style sheet.URL
Add an external link or select an internal page on the website to link to. When the slide is clicked on, it will link to that url.Tip:
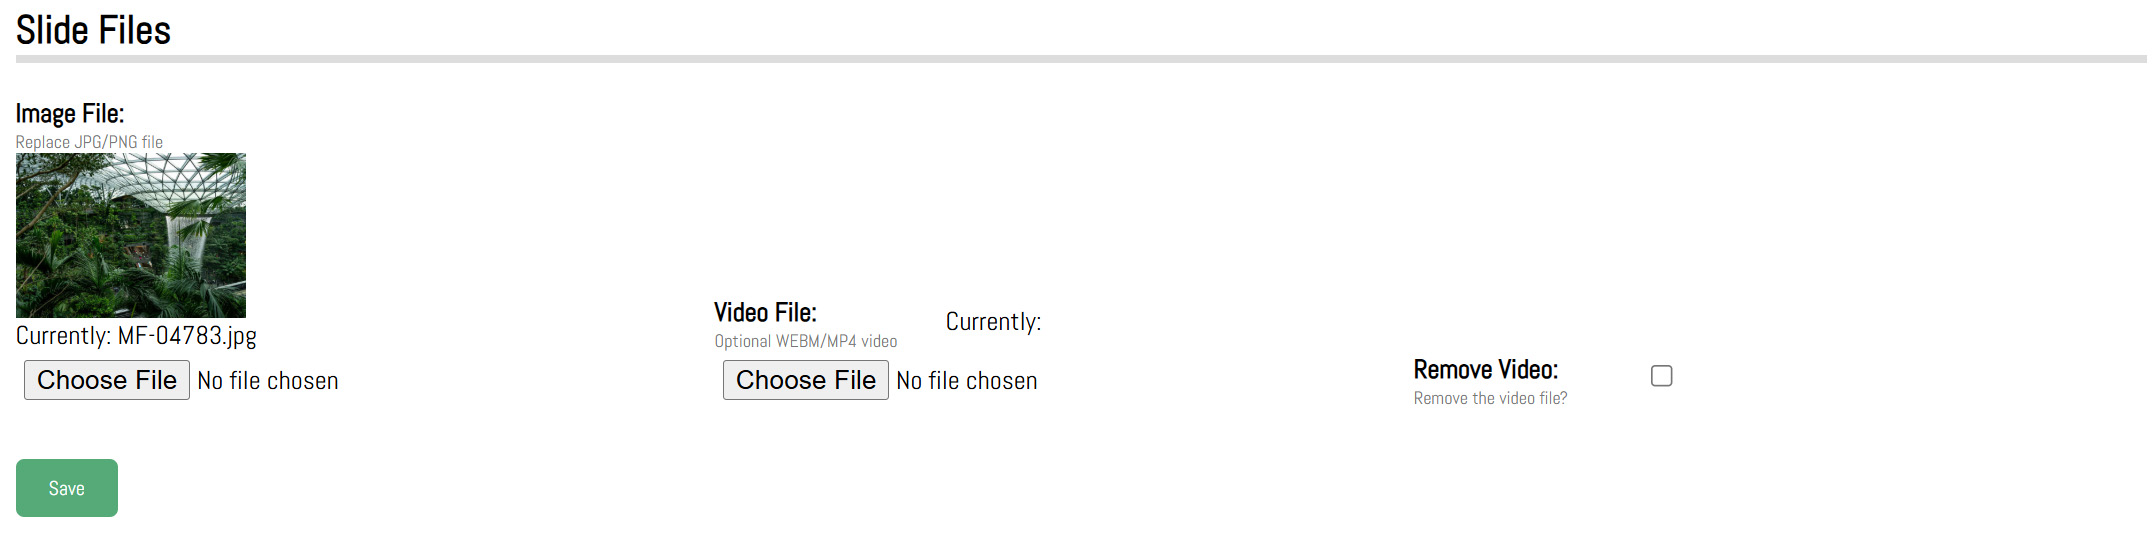
To schedule a slide, the enable check box must be checked. If there is a date set in date hide field, the slide will be disabled however it will still show as checked (enabled). This can be unchecked at any point and the date can be removed to clean up if desired.Slide Files
Image files
Choose an image for the slide. This can be changed at any time.Video file
Lets you add a video file to the slide.Remove video
Checkbox to remove the video file from the slide.Tip:
The video file should be under 15 seconds and under 10mb in file size, either in webm or mp4 file format.Remove a Billboard
Click the remove button on the right-hand side to remove the billboard from the list. PULSE will prompt to confirm.In the search options, clicking on Include Removed checkbox will show all billboards that have been removed which can then be restored using the restore button if needed.
A removed billboard will show as red in the list.
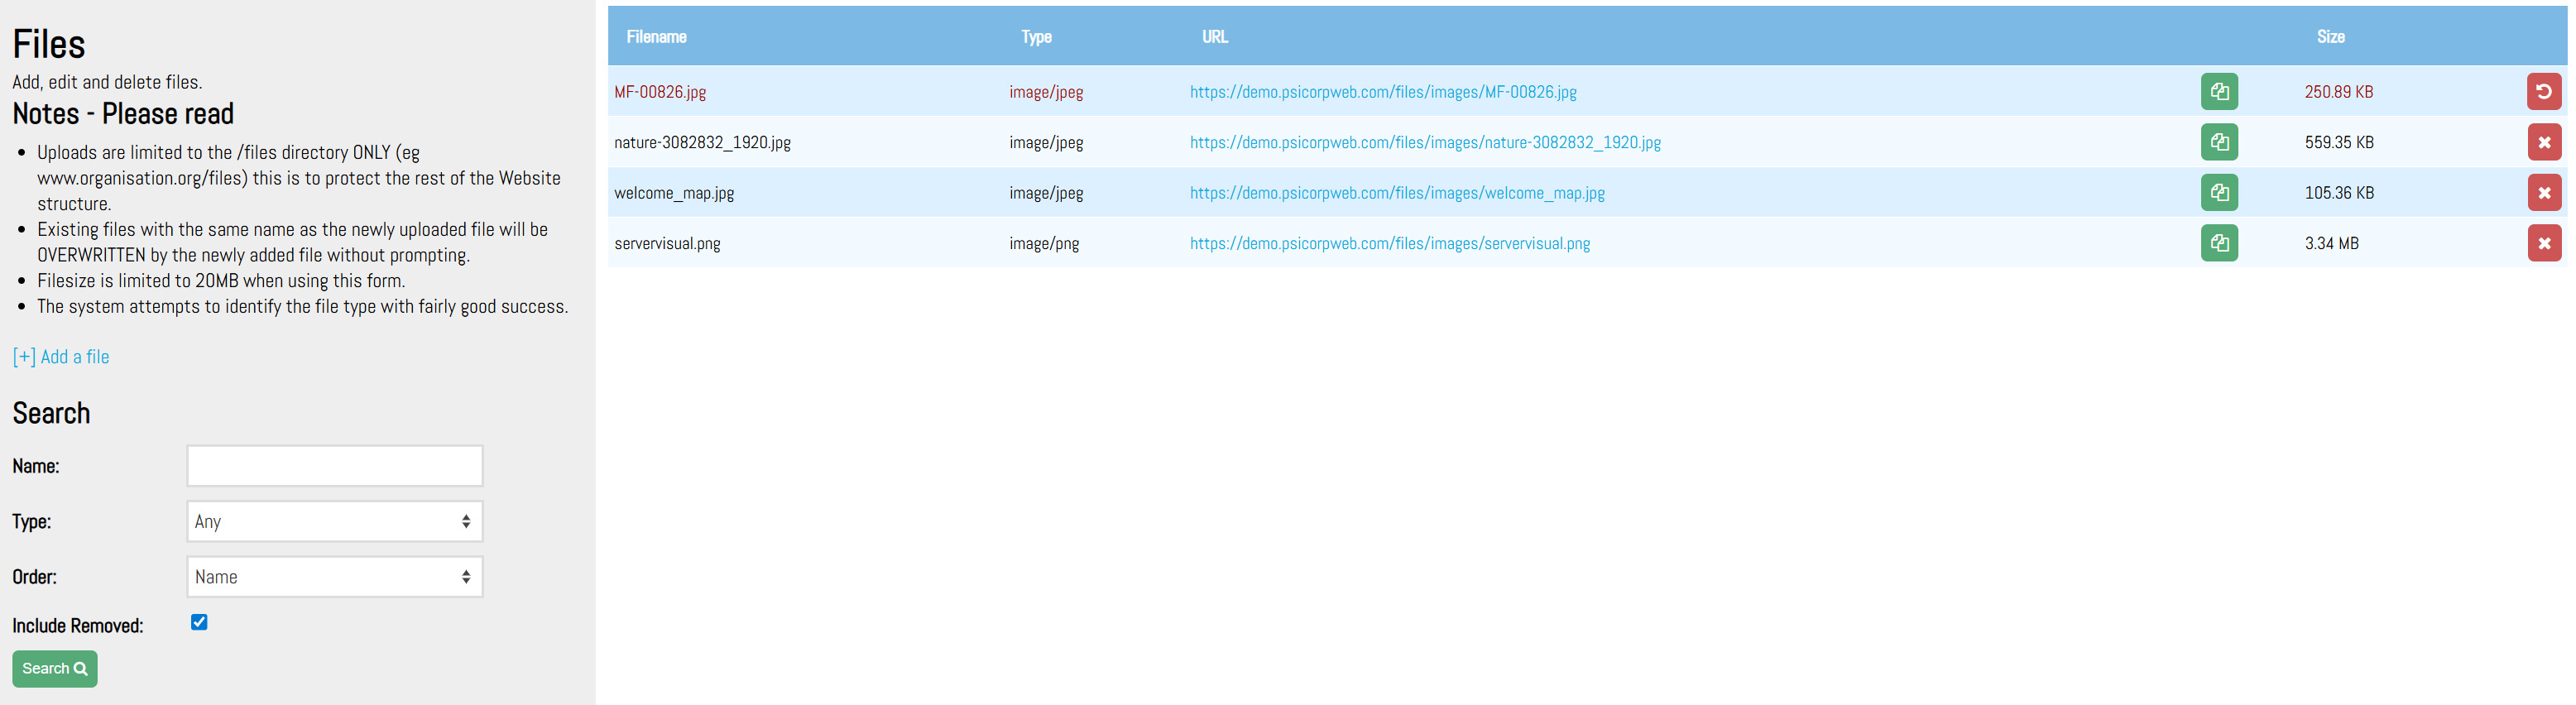
Files
Introduction
Files allows users to add or manage files used on the website.Add Files
Click on [+] Add a file to upload a new file. Choose a file and click Add.Adding a file with the same filename as an existing file will overwrite the file.
Tip:
Images should be resized for web (under 300kb file size and 1600px on the long edge) before uploading.Tip:
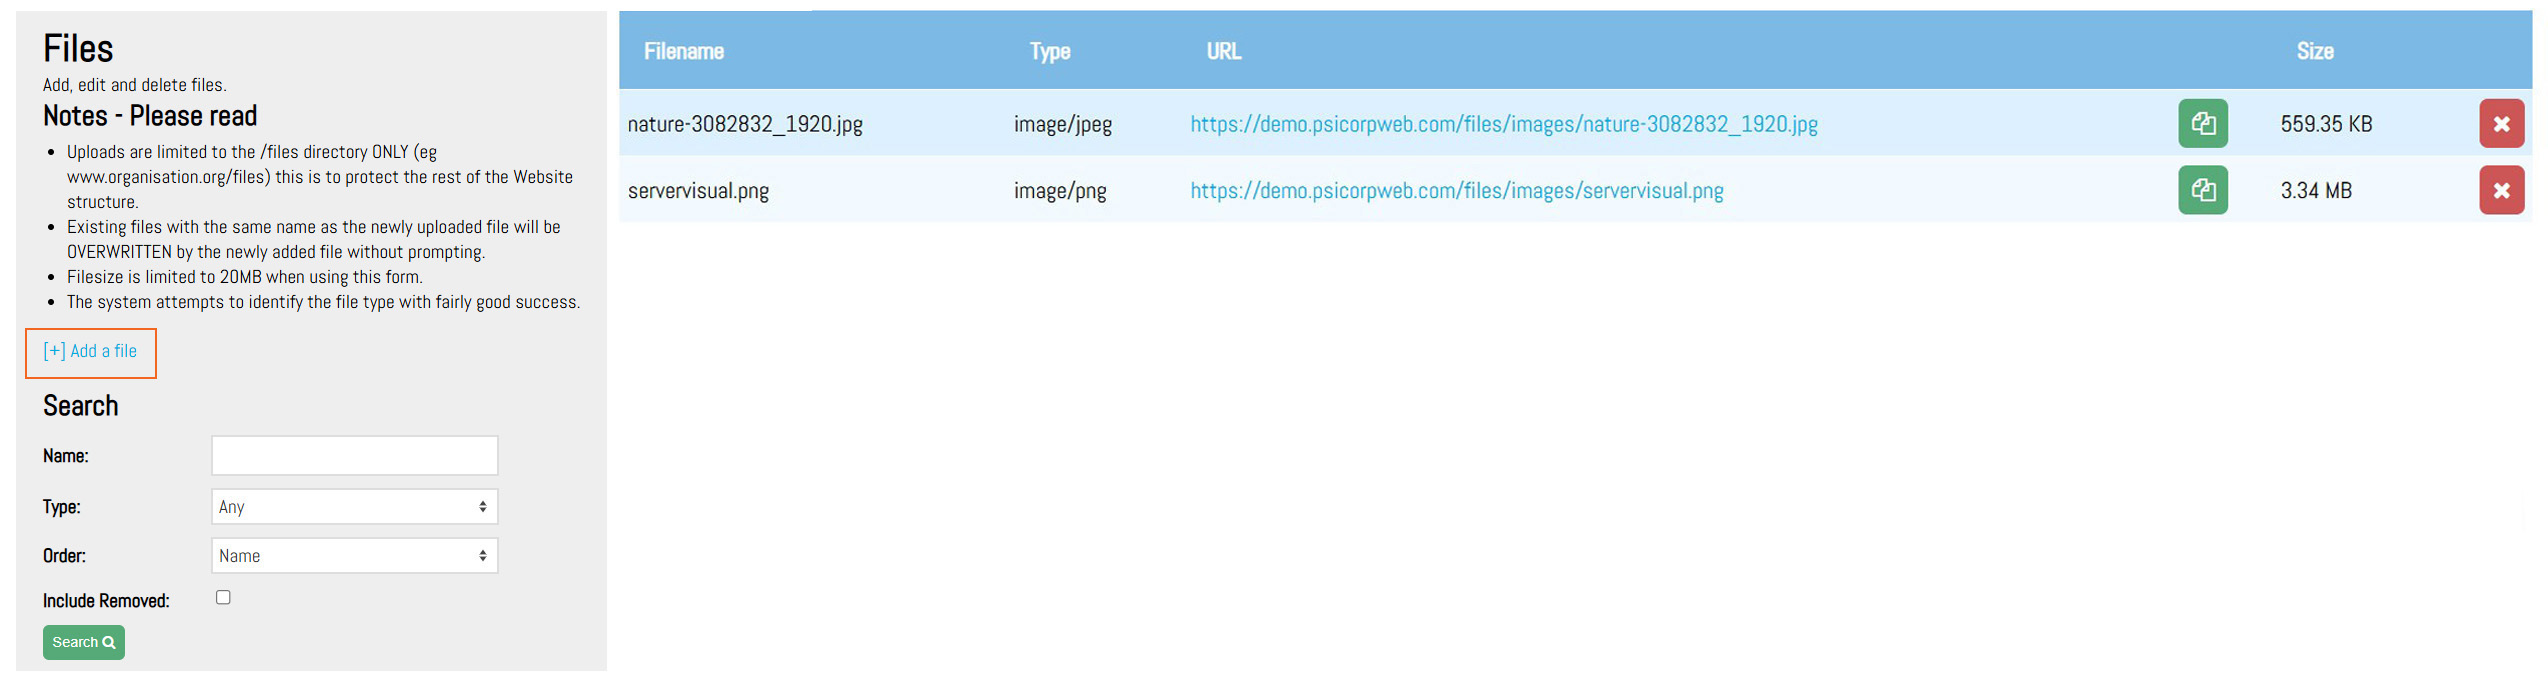
Images should be renamed to remove any spaces or weird characters in the filename to minimize errors. Simple and descriptive filenames should be used.Filename
Shows the file name for the uploaded file.Type
Shows what kind of file has been uploaded.URL
Shows the file’s URL on the server. This is the reference needed when adding an image to a page on the website. Clicking on the URL will open the image. Clicking the green copy button will copy the URL to the clipboard.Tip:
Absolute links use the entire URL, relative links start at “files/…”. Use relative links wherever possible.Size
Shows the file size of the file uploaded to the server.Search
Lets a user search for a file by name or type.Remove Files
Click on the remove button to remove the file. This will remove the file from the list.
If the file needs to be restored, use the search area and select Include Removed to show all files that were removed. They can then be restored by clicking the restore button.
A removed file will show as red in the list.
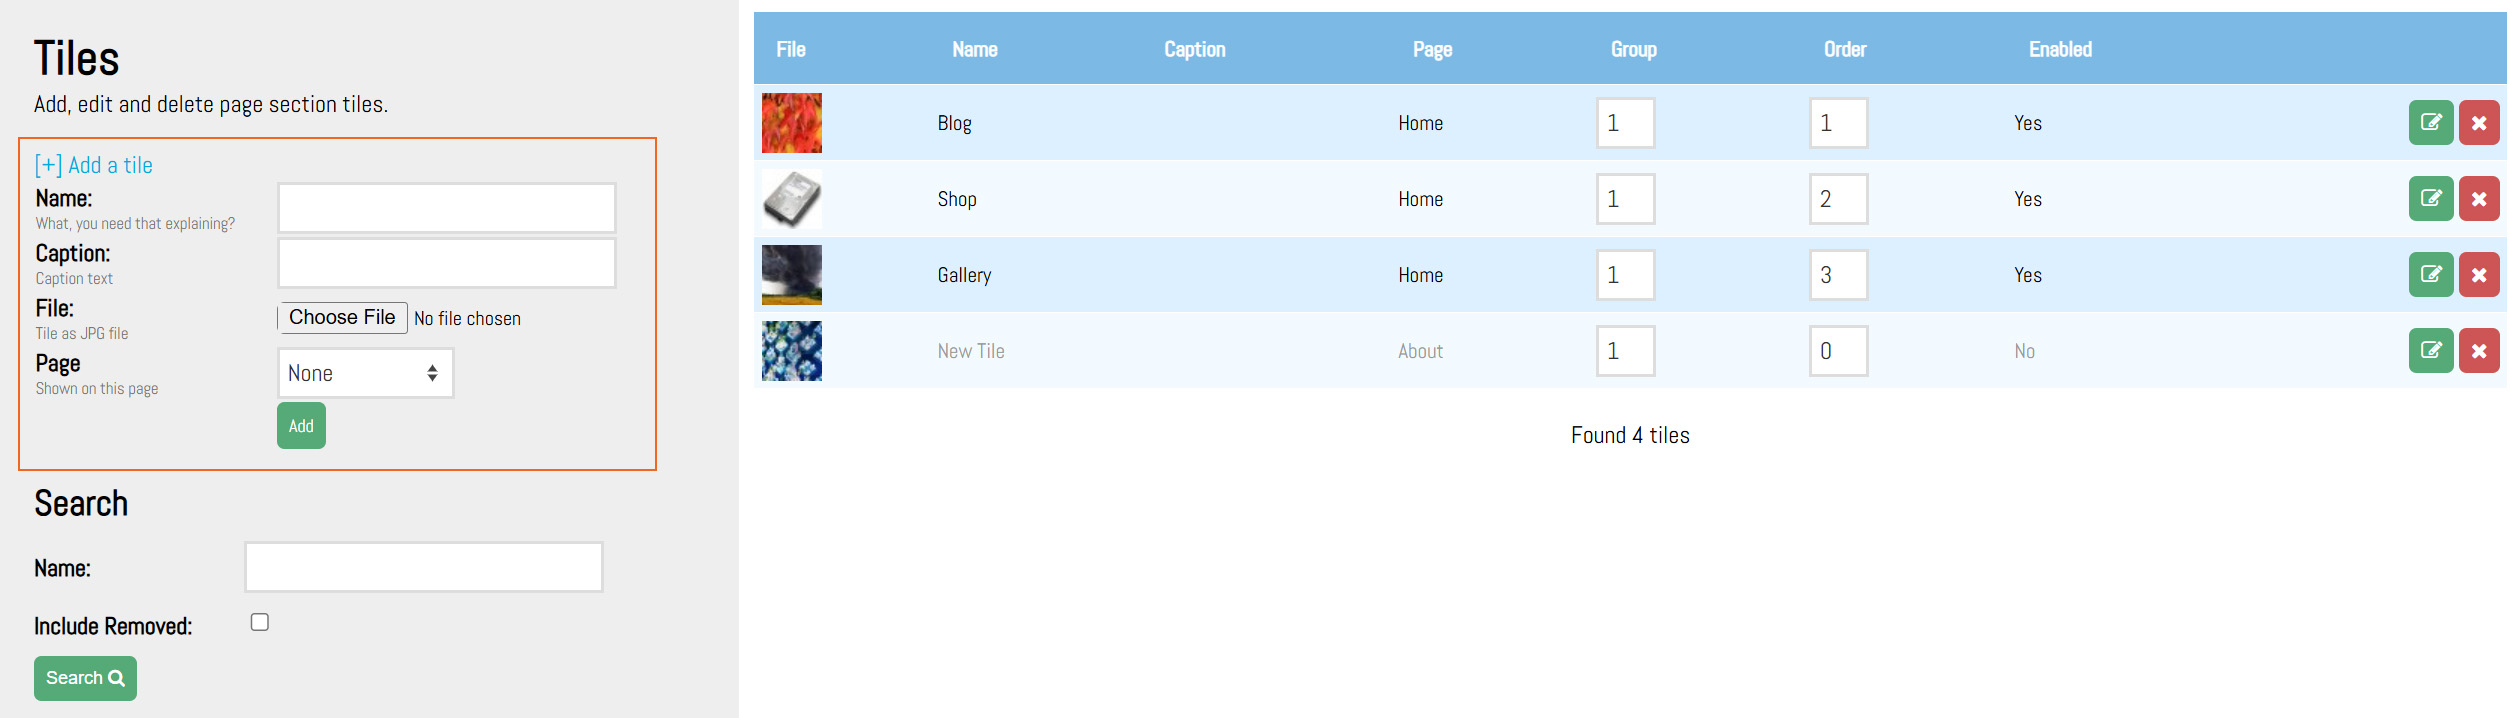
Tiles
Introduction
Tiles allows users to create links with images to another page internal to the website or links to external websites.Add a Tile
Click on [+] Add a tile to create a new tile entry.Give the tile a name and assign it to an existing page on your site.
The caption and image can be added at this time or later when editing.
By clicking green edit button on the righthand side you will go directly to the page where you can create or edit your content.
Clicking remove (red x) it will remove the page from the list.
Ordering and Options
Once a new tile has been added, it will show in the list of tiles.The default state for a new tile is disabled (not viewable by the public). A disabled tile will show as greyed out in the list.All tiles can be re-ordered using the order column with the lowest number being at the top of the list.
Tiles can also be grouped. This is useful when tiles on the same page need to be split up by some other content.
All tiles in a specific group will be shown together on the page that the plugin is on.
Tip:
To use different groups on the same page, the following plugins are needed in the source of the page: [plugin]TILES1[/plugin] for group 1, [plugin]TILES2[/plugin] for group 2, and so on.Edit a Tile
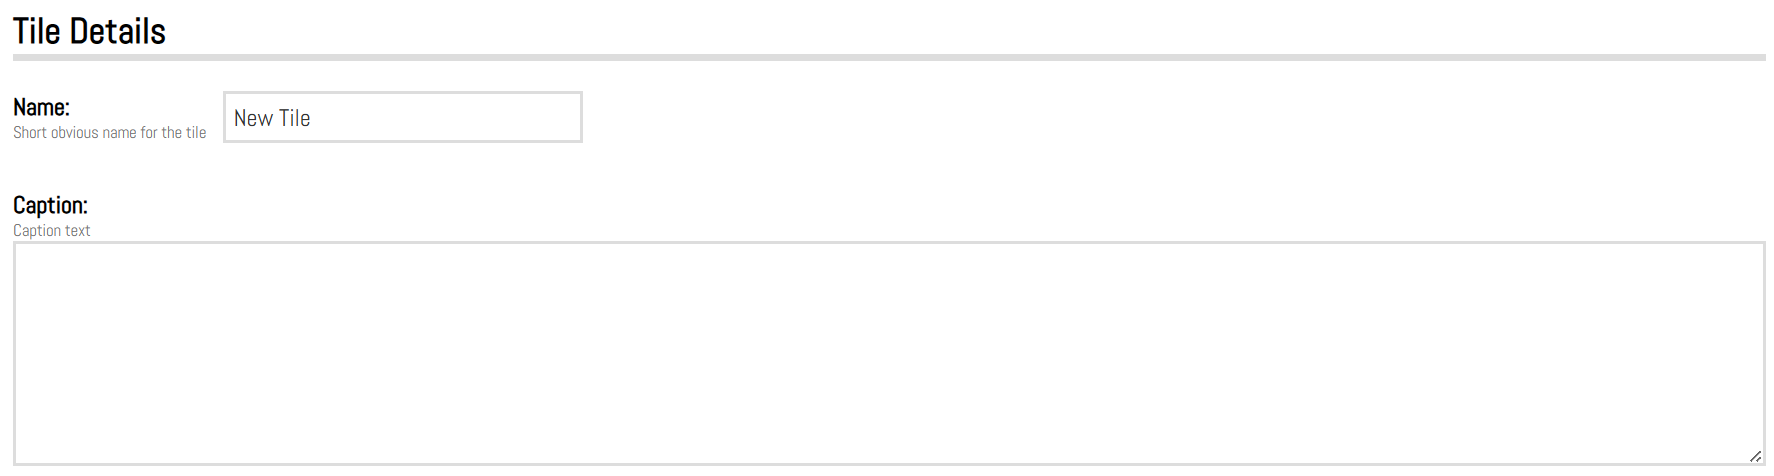
This is where the tiles can be customized, including changing settings and adding images to the tiles.Tile Details
Name
Is an internal name for reference.Caption
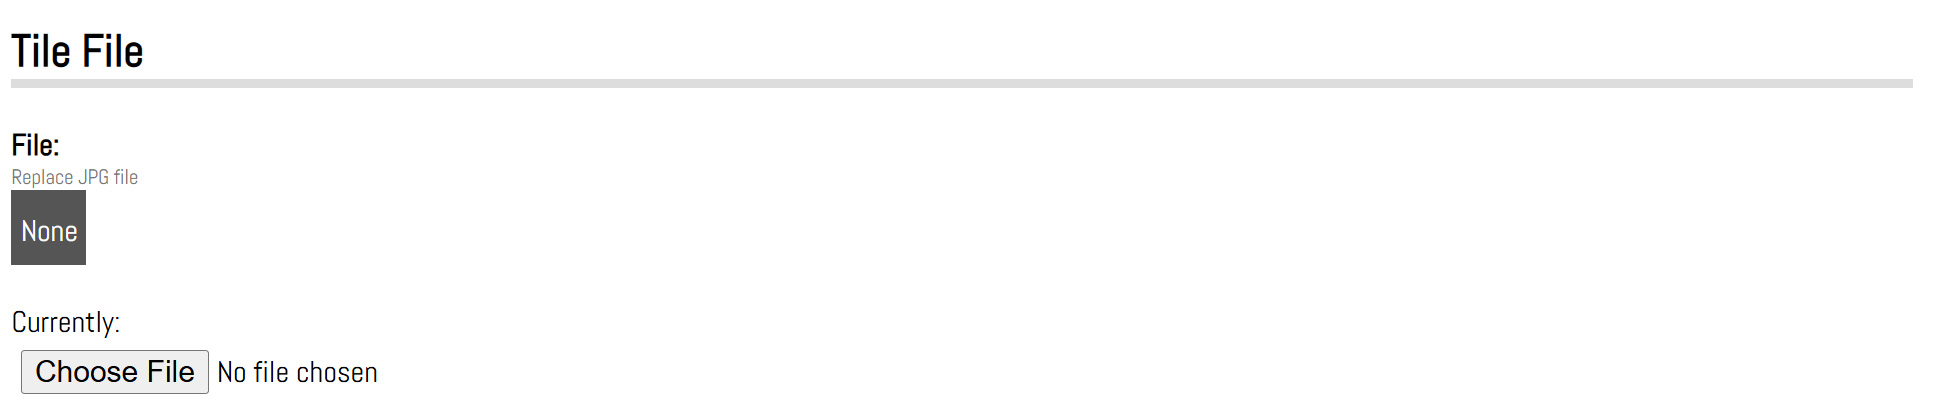
Tile caption text can be plain text or HTML.Tile File
Click on Choose File to add or replace an image for the tile.
Tip:
This image should be resized for web (under 300kb and 1600px on the long edge)Tip:
Keep the subject of the image central and ensure there is clear space around the subject to avoid cutting off anything important.Tile Options
Page
Select the page where the tile is to be displayed on.URL
Set the url (any external link) or select an existing page on the website from the dropdown for the tile to link to.Group
Changes the group the tile belongs to.Order
Changes the order number of the tile.Width
Changes the width with the dropdown options.New Window
Checkbox to set the link to open in new window or tab.Styles
Add custom styles (CSS) to apply to this tile.Enabled
Checkbox to enable or disable the tile.Removed
Checkbox to remove the tile from the list.Save Button
When making changes to the page, ensure the save button is clicked before leaving the page otherwise the changes will not be applied.Remove a Tile
Click the remove button on the right-hand side to remove the tile from the list.
PULSE will prompt to confirm.
In the search options, clicking on Include Removed checkbox will show all tiles that have been removed which can then be restored using the restore button if needed.
A removed tile will show as red in the list.
Blocks
Introduction
Blocks allows users to override the header and footer HTML blocks on the website in addition to building custom html blocks throughout the website.Add a Block
Click on [+] Add a block to create a new block entry. Give the block a name and assign it a type.
Ordering
Once a new block has been added, it will show in the list of blocks.The default state for a new block is disabled (not viewable by the public). A disabled block will show as greyed out in the list.All blocks can be re-ordered using the order column with the lowest number being at the top of the list.
Edit a Block
This is where the block can be customized.
Block Details
The type can be one of the following:
- Header: to replace the default header content on the website.
- Menu: to create a custom menu on the website.
- Content: to add a custom html block anywhere in the body of the website.
- Footer: to replace the default footer content on the website.
Content
to add custom HTML content.Notes
for internal notes or descriptions.Order
changes the order number of the block.Enabled
checkbox to enable or disable the block.Removed
checkbox to remove the block from the blocks list.Save Button
when making changes to the block, ensure the save button is clicked before leaving the page otherwise the changes will not be applied.Remove a Block
Click the remove button on the right-hand side to remove the page from the list. PULSE will prompt to confirm.
In the search options, clicking on Include Removed checkbox will show all blocks that have been removed which can then be restored using the restore button if needed.
A removed block will show as red in the list.
Galleries
Introduction
Galleries allows users to add a gallery of images to any page on the website.Add a Gallery
Click on [+] Add a gallery to create a new gallery entry. Give the gallery a name and assign it to an existing page on the website.
Ordering and Options
Once a new gallery has been added, it will show in the list of galleries. The default state for a new gallery is disabled (not viewable by the public). A disabled gallery will show as greyed out in the list.All galleries can be re-ordered using the order column with the lowest number being at the top of the list.
By clicking green edit button on the righthand side you will go directly to the page where you can create or edit your content.
Edit a Gallery
This is where the gallery settings can be customized and add images to your gallery.Gallery Details
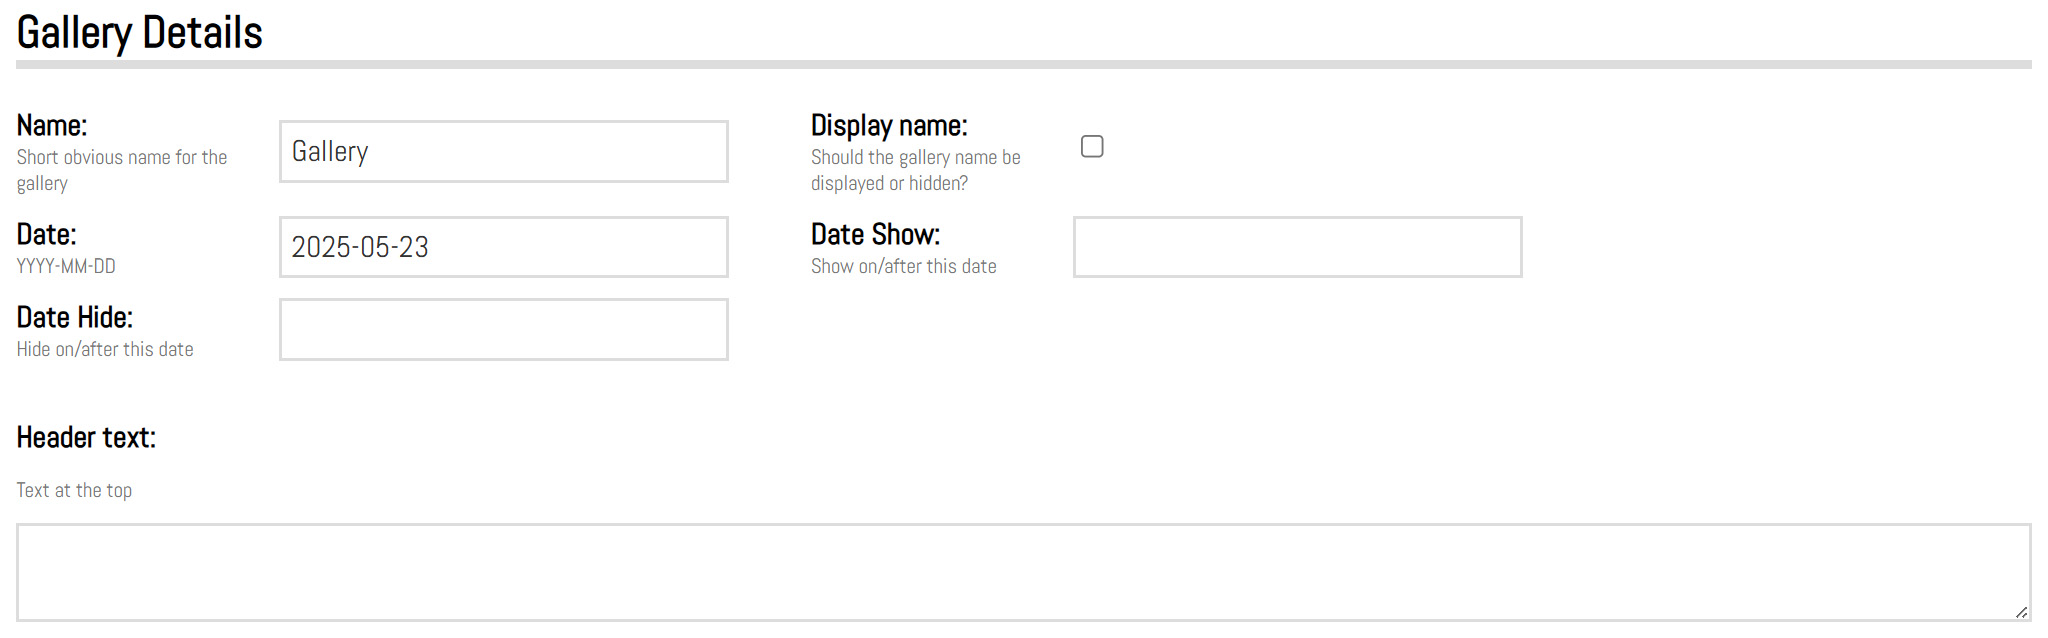
Name
Title for the gallery.Display Name
Checkbox to show or hide the name on the gallery page in the front end.Date
Is the date of the gallery.Date Show
Is the schedule date for the gallery to go live.Date hide
Is the date for the gallery to be disabled.Header text and footer text
To add information above or below the gallery of images. If there is no text, nothing will show.Gallery Options
Page
To select which page the gallery is displayed on.Keep in mind that page needs the following plugin “[plugin]GALLERY[/plugin]” in the source of the page in the location on the page where the is gallery to appear.
Display
Dropdown option to show the photos in various styles:grid, slideshow, mosaic, or carousel.
Width
Modifies the width of the entire gallery in either px or %.The default is 100%.
Height
Modifies the height of the entire gallery in either px or %.The default is auto.
Grid image width
Only applies to the grid display and changes the individual image width in the grid in either px or %.The default is 25% for columns of 4 images.
Image background
Change the container behind the image to be a custom colour. This applies to the grid display or the slideshow display.The default is transparent (no colour).
Slideshow duration
Allows for the slide duration to be changed for the images. This applies only to the slideshow display type.Gallery Columns
To change the number of columns of images to be displayed. This applies only to the mosaic display type.The default value is 3.
Order
To change the order of the galleries if there are multiple galleries per page.Password
To password protect the gallery. This is a simple measure to protect galleries.The password is stored in PULSE in plain text, do not use personal passwords.
Enabled
Checkbox to enable or disable the gallery.Removed
Checkbox to remove the gallery from the gallery list.Tip
Make the password like a coupon code (DH3X9F).Tip
To schedule a gallery, the enable check box must be checked.If there is a date set in date hide field, the gallery will be disabled however it will still show as checked (enabled). This can be unchecked at any point and the date can be removed to clean up if desired.
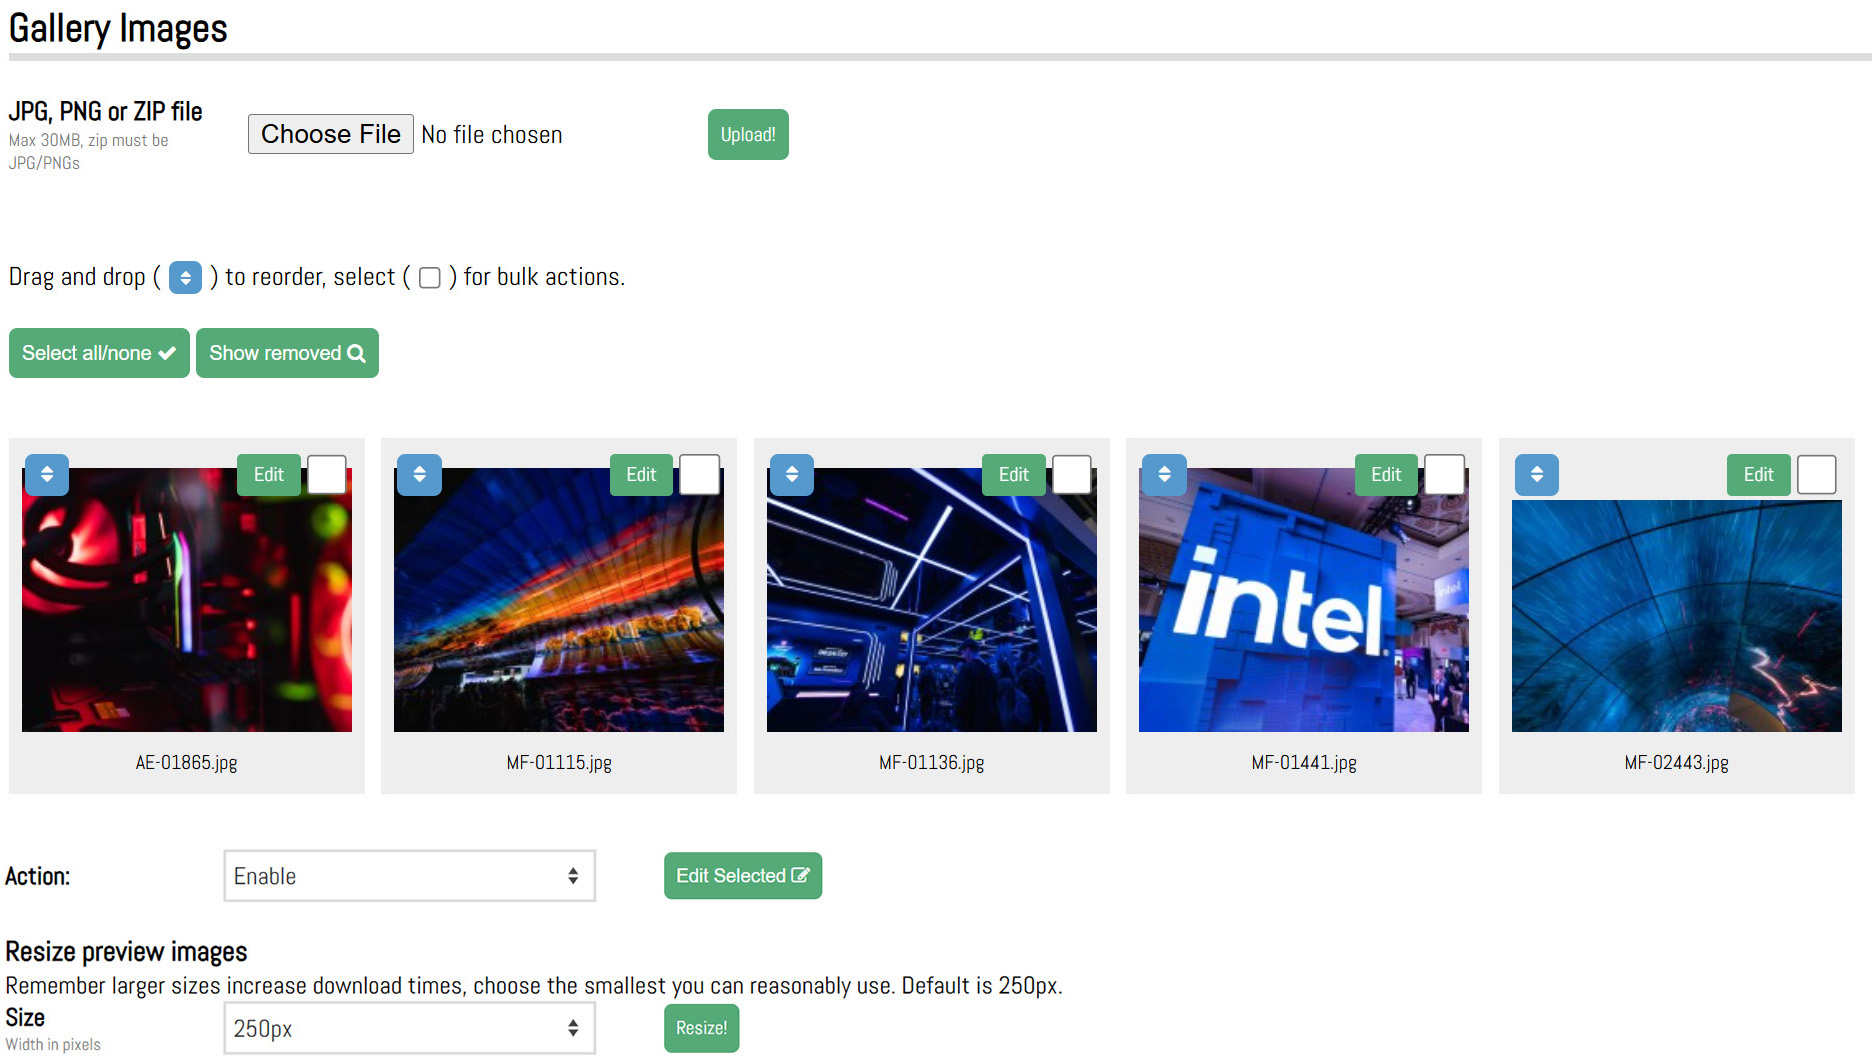
Gallery Images
Click choose file to add individual images or a zip file of multiple images to the gallery. Images once uploaded, can be dragged and dropped to be re-ordered.
Preview images can be resized if they are displayed larger on the front end. Select the new size from the dropdown and click “Resize”.
Tip:
When zipping photos ensure that there are only photo files in the zip. No folders.Remove a Gallery
Click the remove button on the right-hand side to remove the gallery from the list.
PULSE will prompt to confirm.
In the search options, clicking on Include Removed checkbox will show all galleries that have been removed which can then be restored using the restore button if needed.
A removed gallery will show as red in the list.
Testimonials
Introduction
Testimonials allows users to display customer testimonials on the website.Add a Testimonial
Click on [+] Add a testimonial to create a new entry. Add a client name and click Add.By clicking green edit button on the righthand side you will go directly to the page where you can create or edit your content.
Ordering
Testimonials will show in the list. The default state for a new testimonial is disabled (not viewable by the public).A disabled testimonial will show as greyed out in the list.
All testimonials can be re-ordered using the order column with the lowest number being at the top of the list.
Edit a Testimonial
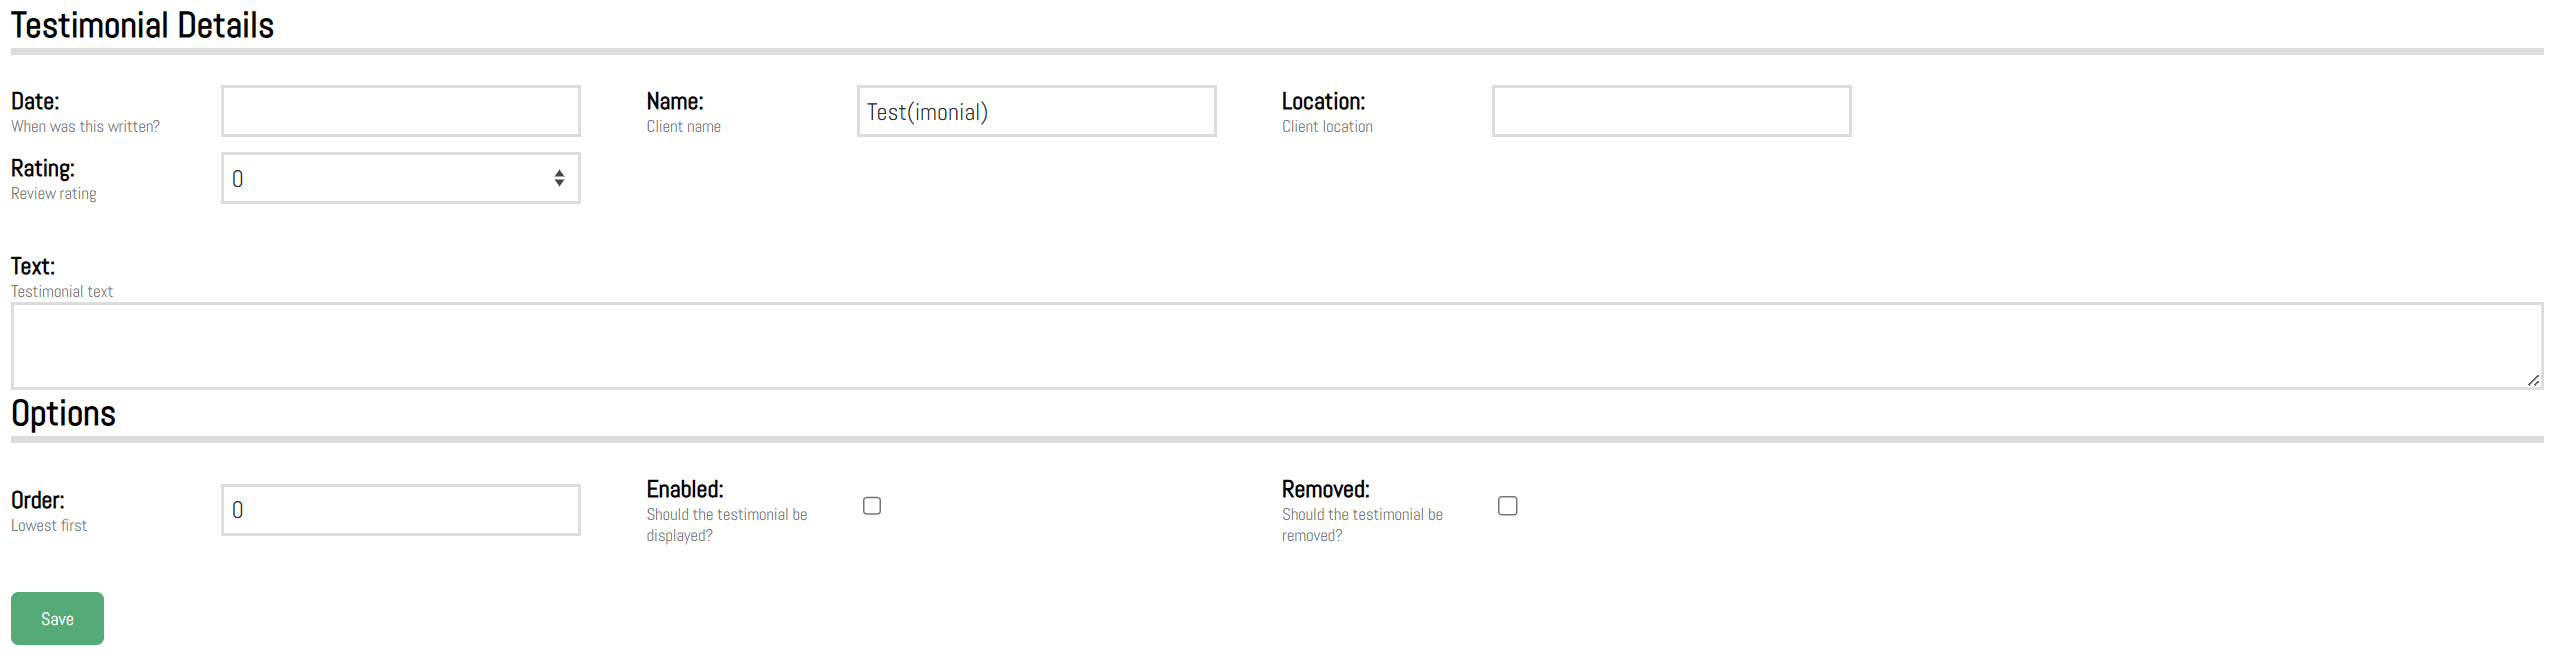
Date
Choose the date of the testimonial.Name
Client or company name (will be viewable by the public).Location
Can be the company or city/country (will be viewable by the public).Rating
Increments of 0.5. Displays as a star rating.Text
To add the testimonial main body text.Order
Changes the order number of the testimonial.Enabled
Checkbox to enable or disable the testimonial.Removed
Checkbox to remove the testimonial from the list.Save Button
When making changes to the page, ensure the save button is clicked before leaving the page otherwise the changes will not be applied.Remove a Testimonial
Click the remove button on the right-hand side to remove the testimonial from the list. PULSE will prompt to confirm.In the search options, clicking on Include Removed checkbox will show all testimonials that have been removed which can then be restored using the restore button if needed.
A removed testimonial will show as red in the list.
Settings
Introduction
Settings allows users to make general website setting changes as well as add custom CSS.Users can also add analytics and tracking code.
Website Details
Year
The year the website was launched (set live).Name
The name of the website or company. This is displayed at the bottom of the website footer in the copyright section as well as in the top right corner in pulse and when selecting a website to edit in PULSE.Logo
Main logo for the website used in the header of the site.Favicon
Square version of the logo or icon used in the browser tab.Banner notice
Customizable field that when populated will show as a closable banner at the top of the website.External CSS
To upload an external stylesheet to override any styles on the website.Embedded CSS
To quickly override any styles on the website or quickly test and add new custom styles.Tip:
Be sure to hit update after making any changes to the above fields in order for the changes to take effect.Analytics and Tracking
Add tracking code to the website. Google or Facebook analytics tracking code can be added here. This will apply to all pages on the website (global). This can also be used to add global JavaScript that needs to be applied sitewide.Save Button
When making changes to the settings, ensure the save button is clicked before leaving the page otherwise the changes will not be applied.